
Use-Cases of this Tutorial
- You want to get verified Paypal IDs as entered by users
- You want to implement "Login with Paypal"
Currently the most common method implemented in web applications to get the user's Paypal email is through an input form - the user enters his Paypal email in a textbox, and submits it. The application "assumes" that the Paypal ID is a real & authentic one, and saves it.
This method however has a problem, that the Paypal ID is not validated. It may be possible that the user entered an incorrect Paypal ID, or his ID is not verified. Only when a payment to a Paypal ID fails, the application comes to know that there is some problem with it.
The solution to this problem is to verify the user's Paypal ID by implementing Login with Paypal feature in your application. You can get the user's verified Paypal ID directly through API calls.
Demo

Please note that the scopes of the above demo does not allow to read your account balance, or perform any transaction. It will just get your profile information. usefulangle.com does not save any of the information.
You can download codes for this demo at the end of the tutorial.
Creating a Paypal Application
The first step is to create a Paypal OAuth application so that you can get the relevant API keys.
- Go to Paypal Developers and login.
Now browse to Sandbox Accounts. If you already have a Business sandbox account in "complete" status then you can proceed to step 4.
Or if you've never used Paypal APIs in the past, the sandbox accounts might be in "error" status. In that case create a new Sanbox account by clicking on the Create Account button.Create a Business (Merchant Account). It is just a sandbox account, so you can enter any details. Click on the Create Account button.
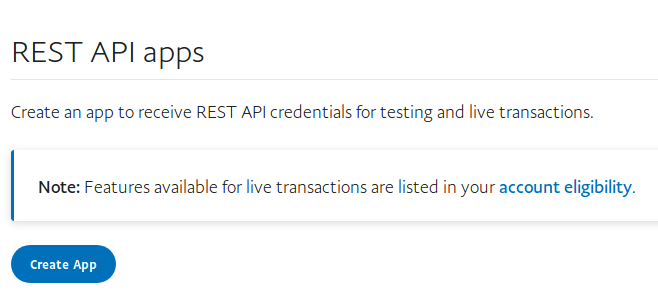
The account will be created, but will be in "processing" status. Keep refreshing the page until you see a "complete" status (it will hardly take a minute).Now go to the My Apps & Credentials page. Go to the section REST API apps, and click on the Create App button.
- In the next page, enter an application name and create the app.
The app should be created successfully.
For this tutorial we will use Live API keys (urls are different for live and sandbox API calls). Click on the Live button, so that you see the API keys of the live application.
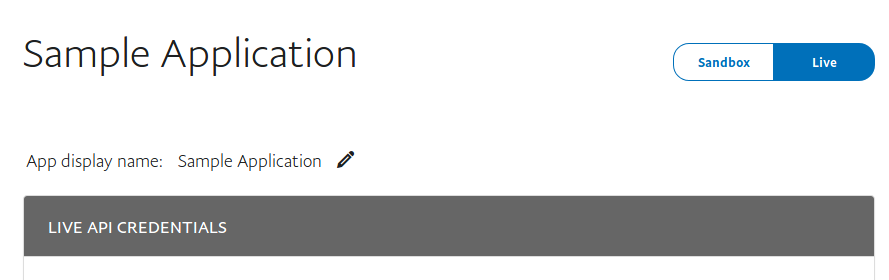
- Under the section LIVE API CREDENTIALS, you will find the Client ID and the Secret. Save them as they will be required later.
Under the section LIVE APP SETTINGS, fill the Live Return URL. This url is basically the OAuth redirect url - after the user authorizes the application, they will be redirected to this url.
You can even use a localhost url for testing purposes.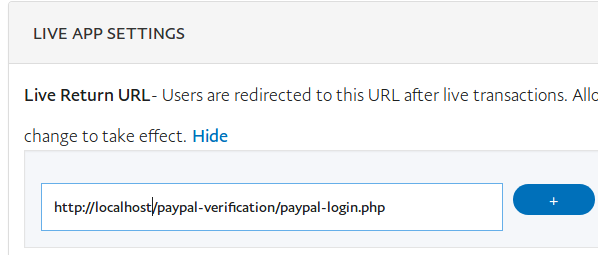 If you are using the attached codes in this tutorial, the redirect url should point to paypal-login.php
Under the App feature options, check only Log In with PayPal
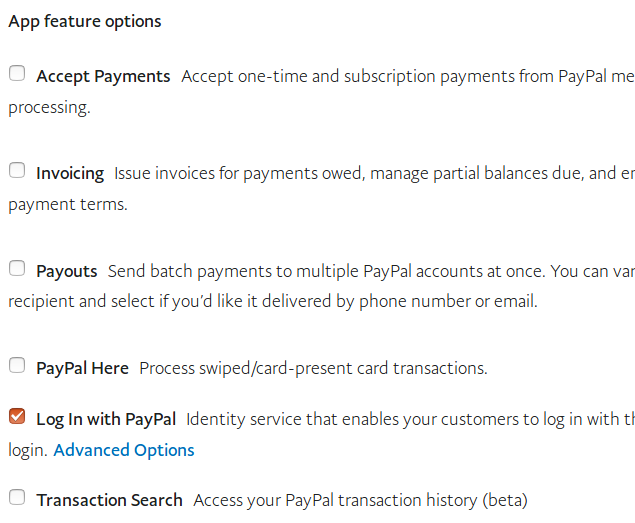
Click on Advanced Options under Log In with PayPal. Here you can choose which information of the user you want to get through the API. For the sake of the tutorial (attached codes uses the same options), chosen options should be like :
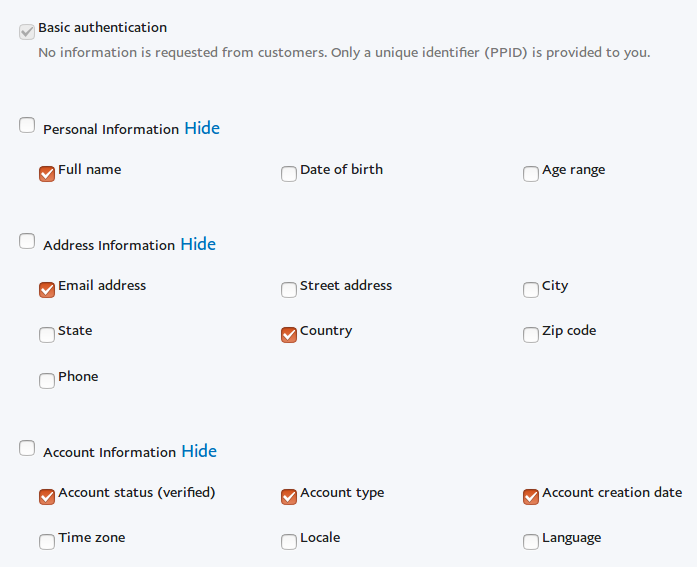 In this case we want to get the user's Full Name, Email (Paypal ID), Country, Account status(verified or not), Account type & Account creation date.
- Enter Privacy policy URL & User agreement URL.
- Save the application settings by clicking on the Save button.
How "Login with Paypal" Works
"Login with Paypal" works in the same way as other OAuth 2.0 login systems.
- You place the Paypal OAuth login link in the HTML code of your web application.
- When a user clicks on this link, he will be redirected to Paypal. He logins with his Paypal credentials, and authorizes the Paypal application.
- After the user authorizes the application, Paypal redirects the user back to your website, appending the OAuth code in the website url (http://website.com?code=12345)
- Your website must use the above OAuth code to make an API call to get the access token of the user.
- Once the access token is received, an API call can be made to get the user details - his name, Paypal ID etc.
Follow steps 1-3 below to implement Login with Paypal in your code.
Step 1 - Save API keys
Save the Paypal App Client ID, Secret and Live Return URL in a settings file.
/* Paypal App Client Id */
define('PAYPAL_CLIENT_ID', 'YOUR-CLIENT-ID');

/* Paypal App Client Secret */
define('PAYPAL_CLIENT_SECRET', 'YOUR-SECRET-KEY');

/* Paypal App Redirect Url */
define('PAYPAL_CLIENT_REDIRECT_URL', 'YOUR-LIVE-RETURN-URL');
Step 2 - Adding Paypal OAuth Login URL in Your Application
Paypal OAuth Login URL is just another Paypal URL. You must add this URL to the required page. You can use any technique to redirect the user to this url - adding <a> element in HTML code, using document.location to redirect via Javascript, or using PHP header to directly redirect the user.
$login_url = 'https://www.paypal.com/signin/authorize?scope=' . urlencode('openid email profile address https://uri.paypal.com/services/paypalattributes') . '&redirect_uri=' . urlencode(PAYPAL_CLIENT_REDIRECT_URL) . '&response_type=code&client_id=' . PAYPAL_CLIENT_ID;Please note that this the live OAuth URL. There is a different URL for sandbox mode.
The 4 parameters appended to https://www.paypal.com/signin/authorize are :
scope : Since we are looking to get user information we need to pass the required scopes for it. The scopes should be as per the options as set in the application's settings.
Please note that the scopes passed in the above URL holds for the below options set while creating the application. If you've chosen different options, the scopes will change.
See Log In with PayPal user attributes for the complete list of scopes. This will be useful if you have checked other options.
- redirect_uri : This is the Live Return URL of the application.
- response_type : This should be set to "code"
- client_id : This is the Client ID of the Paypal application.
This OAuth Login URL will redirect user to Paypal where he can authorize your application.
Step 3 - Managing the Redirect / Return URL Script
After the user authorizes the application, Paypal will redirect him back to a specific URL that you've specified earlier. An OAuth code will also be appended to the URL. The script present at this URL must catch this code, and get the access token of the user.
<?php

// If Paypal passes the OAuth Code in the redirect url
if(isset($_GET['code'])) {
	try {
		// Get access token via an API call
		$access_token = GetAccessToken();

		// Get user details (Paypal ID included) via an API Call
		$user_info = GetUserInfo($access_token);
	}
	catch(Exception $e) {
		echo $e->getMessage();
		exit();
	}
}

?>
The API call to get the access token using the OAuth code :
// $client_id - Paypal App Client ID
// $redirect_uri - Paypal App Return URL
// $client_secret - Paypal App Secret key
// $code - OAuth code
function GetAccessToken($client_id, $redirect_uri, $client_secret, $code) {
$api_url = 'https://api.paypal.com/v1/oauth2/token';
$curl_post = 'client_id=' . $client_id . '&redirect_uri=' . $redirect_uri . '&client_secret=' . $client_secret . '&code='. $code . '&grant_type=authorization_code';
$ch = curl_init();
curl_setopt($ch, CURLOPT_URL, $api_url);
curl_setopt($ch, CURLOPT_RETURNTRANSFER, 1);
curl_setopt($ch, CURLOPT_USERPWD, $client_id . ":" . $client_secret);
curl_setopt($ch, CURLOPT_POST, 1);
curl_setopt($ch, CURLOPT_SSL_VERIFYPEER, FALSE);
curl_setopt($ch, CURLOPT_POSTFIELDS, $curl_post);
$data = json_decode(curl_exec($ch), true);echo '';print_r($data);echo '
';
$http_code = curl_getinfo($ch,CURLINFO_HTTP_CODE);
if($http_code != 200)
throw new Exception('Error : Failed to receieve access token');
return $data['access_token'];
}
The API call to get user information using access token :
// $access_token : Access token of the user
function GetUserInfo($access_token) {
$api_url = 'https://api.paypal.com/v1/oauth2/token/userinfo?schema=openid';
$ch = curl_init();
curl_setopt($ch, CURLOPT_URL, $api_url);
curl_setopt($ch, CURLOPT_RETURNTRANSFER, 1);
curl_setopt($ch, CURLOPT_HTTPHEADER, array('Authorization: Bearer '. $access_token, 'Content-Type: application/json'));
curl_setopt($ch, CURLOPT_SSL_VERIFYPEER, FALSE);
$data = json_decode(curl_exec($ch), true);echo '';print_r($data);echo '
';
$http_code = curl_getinfo($ch, CURLINFO_HTTP_CODE);
if($http_code == 200)
return 1;
else if($http_code == 404)
return -1;
else
throw new Exception('Error : Failed to get user information');
}